還記得從前玩過的Dust, Dust 2, Aztec, Italy等CS經典地圖嗎?經典地圖到底有哪些經典的元素?從耳熟能詳的layout中一窺CS:GO的六項多人對戰關卡設計原則:
1: 藉由衝突點Choke points來提升以及促進整個gameplay
2: 衝突點必須放置於攻方到達目的地(objective)之前
3: 兩隊到達衝突點的時間必須一致
4: 限制通往衝突點的入口至一到兩條
5: 提供支持狙擊、近戰和潛行等多樣玩法風格
6: 基於人質護送模式的動態衝突點設計(Italy)
=========


1: 藉由衝突點Choke points來提升以及促進整個gameplay
2: 衝突點必須放置於攻方到達目的地(objective)之前
3: 兩隊到達衝突點的時間必須一致
4: 限制通往衝突點的入口至一到兩條
5: 提供支持狙擊、近戰和潛行等多樣玩法風格
6: 基於人質護送模式的動態衝突點設計(Italy)
=========
Choke points are areas of the map where the attacking team meets resistance from the defending team before reaching the objective. Choke points are also called control points or bottlenecks.
The attacking team (Terrorist in defuse maps and Counter-Terrorist in hostage rescue maps) must fight through the choke point to reach the objective or retreat and try a different route/strategy.
Choke point areas are specifically designed to enhance gameplay. They are used tocontrol flow, pacing and balance within the map. Whether you are playing Dust (Underpass choke point), Office (Side Hall choke point) or Nuke (Outside choke point), each of these areas are manually crafted. The architecture, cover placement and timing are used to channel each team to attack or defend.
In this blog post I will cover 6 principles of choke point design and choke points used in most played official maps.
PRINCIPLE 1: ENHANCE AND FACILITATE GAMEPLAY
Choke points must enhance and facilitate gameplay (combat). To do this you must narrow the flow of your map through architecture down to a single (or double) viewable entrance, such as a hallway, doorway, tunnel or alleyway. This area becomes a choke point where two teams meet and battle for control.
Few examples of choke points:
Dust Underpass/Overpass choke point:
Aztec Double Doors and Bridge:
Italy at Long Hall and after Apartments Alleyway rounding the corner to T spawn:
You want to spend time crafting your choke points because the players will be spending a lot of time in this area.
PRINCIPLE 2: CHOKE POINT PLACEMENT
Choke points must be placed before the attacking team reaches the map's objective. The attacking team needs to fight through the choke point in order to reach the objective (rescue hostages or plant the bomb). You must design your map layout to allow for that. The defending team arrives at the objective and has to defend it by not allowing the attacking team to break through the choke point. This is the key to effective map layout in Counter-Strike.
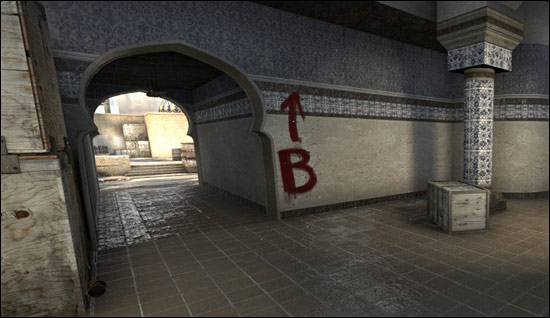
For example look at Inferno B site Banana choke point, CTs must defend the alleyway entrance:
Mirage site A at Palace Tunnel and Palace Interior choke points:
PRINCIPLE 3: TIMING
Timing is very important in choke point design. You want both teams to arrive at the choke point almost at the same time. Defending team can reach the choke point few seconds earlier to set up position. The important part is that the attacking team should never be able to rush through the choke point while the defending team is just arriving there.
Timing choke point arrivals are done in BSP block in stage of your map creation.
Here is the process I use. At the beginning of the round I switch to knife so I can travel at maximum speed and run to the choke point. I use the game clock (round timer) to keep track of the time in seconds it takes me to reach the choke point. Once I get there I write down how long it took me. Then, I do the same thing for the other team side. If the times are different I move the choke point or the spawn points for each team, making sure that the arrival is about the same or slightly earlier for defending team.
Sometimes depending on the map, the defending team can arrive at the objective way before the attacking team. Dust 2 site A is a good example:
PRINCIPLE 4: NUMBER OF ENTRANCES/EXITS
Limit entrance options to the objective within a choke point down to one or two entrances. The attacking team should not easily take over the objective. Most maps in Counter-Strike have a single pathway choke point.
Dust 2 (Upper Tunnel) single tunnel leading to the objective.
Aztec (Double Doors):
2 pathway entrance through a choke point offer a choice and strategy for the attacking team. It makes what could be a boring choke point and adds strategy.
If you are going to create 2 pathway entrance through a choke point, make sure that each entrance is clearly visible to the defending team within the same point of view. Avoid more than 2 entry locations to the objective within the same choke point that is not visible from same point of view. Control your choke points and you will control gameplay.
Examples:
Dust (Underpass and Up the Stairs to Overpass) - both are visible and can be seen at the same time, but giving a strategy option for that choke point:
Inferno (Apartments or Long) two options for the attacking team but manageable for the defending team:
You have to effectively narrow down the options to one or two entrances for the attacking team to get through and plant the bomb. Bottle neck the layout design to funnel teams to these positions.
PRINCIPLE 5: PLAYING STYLES
Each map's choke points should support various playing styles - sniping, close quarter combat or stealth. The more gameplay styles you can support within the map, the more it will appeal to wider range of players. You want to design for strategy and skill. To do this effectively, use distance and cover as a design layout element.
Nuke is a good example of using distance to allow variety of gameplay styles. Outside choke point is good for sniping. Hut, Squeaky and Radio allows for medium and close quarter battles as well as some stealth.
Distance options:
- Long
- Short
- Narrow
- Wide
You can also use distance vertically (height) as design gameplay element.
Aztec: Double Doors (short and long) good for sniping and close quarter battles:
Train: Middle (short, medium) good for medium/close quarter battles and stealth:
Militia: interior of the house (close quarter combat and stealth)
PRINCIPLE 6: DYNAMIC CHOKE POINTS
Choke points in hostage rescue map are dynamic. Hostage rescue does not require very precise and timed approach as it does for defuse maps. It is because choke points will change based on if Terrorist team plays aggressively (attacking) or passively (defending). So when designing hostage rescue maps, you will need to think how the defending team may play.
The main thing you want to do is limit pathways to hostage rescue locations down to 2 or 3.
Italy has 3 main pathways routes from which CTs will come from:
Office also has 3:
Let's me explain a bit further about dynamic choke point design of hostage rescue maps.
Italy is great example. If CTs go right through the market there are 2 battle areas where they may encounter Terrorist.
If terrorist rush, Market will become the choke point:
If Terrorist defend and stay near spawn then Long Hall becomes the choke point.
This defend/attack choke point map dynamic is what you want to create in your own hostage maps.
Here is how to come up with dynamic choke points:
- First choke point if Terrorist team defends and stays near hostages
- Second choke point if Terrorist attack and rush towards the CT team.
Make sure to read this in-depth guide about multiplayer map layout creation.
IDEAS FOR CHOKE POINT DESIGN:
Now that you know the principles let's take a look at some ideas for areas. I will keep this section short because this will depend on the theme you have for your map. Hallways and Doorways will seem like a natural choke point in an interior (office) type map, while Alleyway or Streets is the natural choice for urban (Inferno) setting type.
- Hallways or Tunnels (Office, Train, Italy)
- Doors/Doorways (Train, Aztec)
- Alleyway/Street (Dust, Inferno)
- Battle Areas (Nuke, Mirage)
Battle Areas: these are more open ended choke points with variety of options and cover within a given area. An example of these are Mirage (Middle), Italy (Market) and Train (Site A):
Recommended Reading: CSGO Multiplayer Map Layout Design (In-Depth How to Guide)
原文出處:《CS:GO 6 Principles of Choke Point Level Design》
原文出處:《CS:GO 6 Principles of Choke Point Level Design》
留言
張貼留言